GenomeCloud: Difference between revisions
From Genecats
Jump to navigationJump to search
(Adding some more notes) |
(adding pretty pictures) |
||
| Line 9: | Line 9: | ||
** The page displays notes on how to use <code>ssh-keygen -t rsa -f cloud.key</code> generate your key-pair | ** The page displays notes on how to use <code>ssh-keygen -t rsa -f cloud.key</code> generate your key-pair | ||
** Then you can get that public key and copy it using <code>$cat cloud.key.pub .... ssh-rsa AAAAB3NzaC1yc2EAAAADAQABAAABA......</code> | ** Then you can get that public key and copy it using <code>$cat cloud.key.pub .... ssh-rsa AAAAB3NzaC1yc2EAAAADAQABAAABA......</code> | ||
* Click "Import Key Pair" previously check "Allow SSH" | * Click "Import Key Pair" (previously check "Allow SSH)" | ||
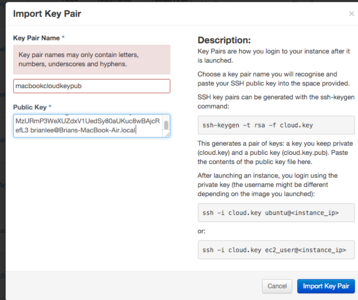
[[File:GenomeClouldKeyPair.jpg|800x300px]] | |||
* Networking: Drag the CBSE network onto "Selected Networks" (either network is fine) | * Networking: Drag the CBSE network onto "Selected Networks" (either network is fine) | ||
* Click "Launch" | * Click "Launch" | ||
* Wait for a while until you see it in the list of instances, then click "More" - "Associate Floating IP", select an IP, "OK" | * Wait for a while until you see it in the list of instances, then click "More" - "Associate Floating IP", select an IP, "OK" | ||
[[File:GenomeClouldIP.jpg|600x150px]] | |||
* From your terminal, the one where you copied the SSH key from, do "ssh USER@IPADDRESS" | * From your terminal, the one where you copied the SSH key from, do "ssh USER@IPADDRESS" | ||
**General Example: <code> ssh -i cloud.key ubuntu@<instance_ip></code> Specific: <code> ssh -i cloud.key ubuntu@128.114.61.171 </code> | **General Example: <code> ssh -i cloud.key ubuntu@<instance_ip></code> Specific: <code> ssh -i cloud.key ubuntu@128.114.61.171 </code> | ||
* USER is ubuntu for ubuntu and centos for centos images, otherwise do "View Log" on the instance and look for a username in there. | * USER is ubuntu for ubuntu and centos for centos images, otherwise do "View Log" on the instance and look for a username in there. | ||
Revision as of 21:12, 3 March 2016
To use the CBSE cloud, go to:
- Goto [https://genome-cloud.soe.ucsc.edu]
- Use your SOE username to login (unless otherwise specified when the account was created).
- Instances - Launch Instance
- Create a new VM, prefix it with your username to ensure people can contact you.
- Instance Boot source = Image, Select an image for your preferred OS
- Access & Security: Click the "+" button and upload your SSH public key from ~/.ssh/id_rsa.pub
- The page displays notes on how to use
ssh-keygen -t rsa -f cloud.keygenerate your key-pair - Then you can get that public key and copy it using
$cat cloud.key.pub .... ssh-rsa AAAAB3NzaC1yc2EAAAADAQABAAABA......
- The page displays notes on how to use
- Click "Import Key Pair" (previously check "Allow SSH)"
- Networking: Drag the CBSE network onto "Selected Networks" (either network is fine)
- Click "Launch"
- Wait for a while until you see it in the list of instances, then click "More" - "Associate Floating IP", select an IP, "OK"
- From your terminal, the one where you copied the SSH key from, do "ssh USER@IPADDRESS"
- General Example:
ssh -i cloud.key ubuntu@<instance_ip>Specific:ssh -i cloud.key ubuntu@128.114.61.171
- General Example:
- USER is ubuntu for ubuntu and centos for centos images, otherwise do "View Log" on the instance and look for a username in there.

