Wrangling process
This page is intended to serve as a set of guidelines for wrangling a dataset into the Cell Browser, both those from archives (e.g. GEO) or those submitted to us by an external collaborator (aka live wrangling). It should be noted that this list is not comprehensive; there may be things that need to be done that aren’t covered here, or you might skip steps that aren’t relevant to your current dataset.
For a collection, most steps will apply to each dataset in that collection, however, a few (e.g. ‘Respond to submitters’) only apply to the collection as a whole.
Respond to submitters
This step only applies to ‘live wrangled’ datasets. Researchers will email us at cells@ucsc.edu requesting that we host their data. When you respond to them, do these NN things in your response (unless they’ve already mentioned them):
- Let them know we can host it
- Point them to the submission guidelines
- Ask if this is for a publication (so you can gauge their timeline)
- Ask if they want the dataset hidden
It’s best to respond to these emails within 24-48 hrs of receiving them.
Example emails/responses:
- Zhiwei Li, mouse-asthma dataset
- Their email:
- Dear Sir or Madam,
- I have a single cell dataset of mouse lung in allergic asthma, and the relevant paper is accepted to be published in Allergy,
- I have set a UCSC cell browser in my local computer, and I want share the single cell data to the the website http://cells.ucsc.edu for public access, please tell me how to do it. Thank you.
- Best wishes,
- Dr. Zhiwei Li
- Our response:
- Hello, Zhiwei.
- We would be happy to host your data on the UCSC Cell Browser. Please take a look at our submission guidelines: https://cellbrowser.readthedocs.io/en/master/submission.html. Let us know if you have any questions.
- Thank you!
- Angela Ting, adult-ureter dataset
- Their email:
- To whom this may concern,
- We are preparing to resubmit our manuscript containing normal human ureter single-cell data to Developmental Cell (https://www.biorxiv.org/content/10.1101/2021.12.22.473889v1). The raw data and expression matrix have already been accepted by GEO, but we would like to deposit this data with UCSC cell browser to enable convenient access/utilization by the broader scientific community.
- Please advise.
- Our response
- Hi, Angela.
- We'd be happy to host your data on the Cell Browser. Please review this page for more information about submitting data: https://cellbrowser.readthedocs.io/en/master/submission.html. After you've prepared everything for submission, feel free to share the required files and we can get started on the import. Let us know if you have any questions about the process!
- Thanks!
Make a directory
Make a directory with the dataset short name in /hive/data/inside/cells/datasets. The submitters should have supplied you with one since it’s mentioned on the submission guidelines page. If not, you can ask them if they had a short name in mind and share the short name requirements with them. You will most likely have to adjust their suggested name.
If it’s a dataset you’re wrangling from the archives, you will have to think of a short name that captures the main idea of the dataset while adhering to our requirements.
Short name requirements:
- 4 words or less
- All lowercase
- Separate words with “-”
- Aim for 20 characters or less
Some common shortenings/contractions we use:
- dev for developing
- org for organoids
- vasc for vascular
Some examples of good short names:
- tabula-sapiens
- mouse-dev-brain
- mouse-gastrulation
- hgap
- covid19-brain
(You may notice that there are quite a few datasets that don’t seem to follow these guidelines. These were created before we established these rules and are ‘grandfathered’ in. You can’t change a short name once it’s been published to the main site.)
Make entry in spreadsheet
Download files
Within the directory made in the last step, make an ‘orig’ directory - place ‘original’ files there. The files downloaded to orig should remain (mostly) unchanged from those you downloaded.
The easiest way of downloading a file is via aria2c:
aria2c https://ftp.ncbi.nlm.nih.gov/geo/series/GSE179nnn/GSE179427/suppl/GSE179427_countmtx.csv.gz
aria2c -o TS_germ_line.h5ad.gz 'https://figshare.com/ndownloader/files/34702051'
In this second example, the -o option allows us to specify a name for the final file, rather than wget’s default of assigning the name based on the last part of the URL ('34702051' in this case).
If you have multiple files, place all of the URLs into a single file and use the ‘-i’ option:
aria2c -i my_files.lst
The utility rclone is another option for downloading files, though it does take some effort to set up. See our internal instructions. Once you have it set up, it is fairly easy to use (quite similar to .
If all else fails, you may need to download files to your computer and then upload those to hgwdev using scp:
scp <files> <uname>@hgwdev.gi.ucsc.edu:/hive/data/inside/cells/datasets/<dname>/orig
(If you do need to go this route, it’s probably best to do this while on the UCSC network to save your own bandwidth.)
Import data
You will use different utilities depending on your starting files:
- cbImportScanpy for h5ad or loom
- Use h5adMetaInfo to find an input field for the -c/–clusterField option
- cbImportScanpy has some default fields hardcoded (so you can skip -c in these cases):
- ["CellType", "cell_type", "Celltypes", "Cell_type", "celltype", "annotated_cell_identity.text", "BroadCellType", "Class"]
- cbImportSeurat for RDS, Rdata, or Robj
- Use rdsMetaInfo to find an input field for the -c/–clusterField option
- cbImportSeurat defaults to active.ident, so if that looks sufficient, it may not be necessary to use -c.
- For tsv/csv files, you will be starting with a matrix file, metadata, and layout coordinates.
- Use tabInfo on meta.tsv to find a field to use as the default color/label fields
- Create a default cellbrowser.conf with cbBuild --init then adjust the default file names as needed
- If the submitter provided cluster markers, use those. If not, generate them using cbScanpy [link to other section]
If you need to generate the UMAP/tSNE coordinates, use [cbScanpy].
Commit cellbrowser/desc.conf files
This is only for public datasets (i.e. those without visibility=”hide” in their cellbrowser.conf).
The cellbrowser-confs repo houses the configuration files for all of the public datasets in the Cell Browser. Add your cellbrowser.conf and desc.conf files to this repo early so that you can track the changes that you and others make throughout the submission process.
git add cellbrowser.conf desc.conf
git commit -m “Initial commit of cellbrowser.conf and desc.conf files for BLAH dataset”
For a collection, you will need to commit the desc.conf and cellbrowser.conf for each dataset in that collection, either individually or all at once, such as:
git add cellbrowser.conf desc.conf all-tissues/desc.conf all-tissues/cellbrowser.conf immune/cellbrowser.conf immune/desc.conf
Annotate marker genes (human-only)
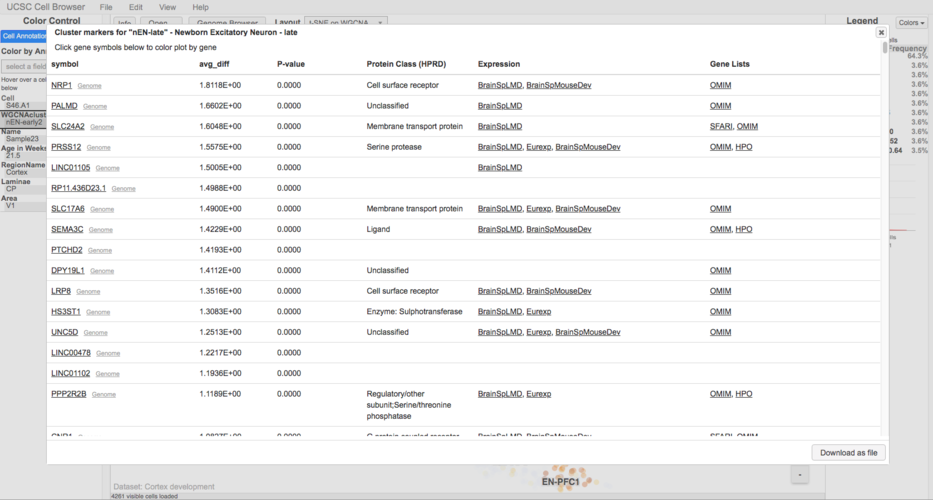
Annotating the marker genes file will add linkouts to the marker gene pop-up to a number of different resources, such as OMIM:
To annotate the marker genes run:
cbMarkerAnnotate markers.tsv markers.annotated.tsv
This places the annotated marker genes into a new file called markers.annotated.tsv. Be sure to update the ‘markers’ line in the cellbrowser.conf to point to this new file.
Run cbBuild
Build the dataset onto cells-test using the command:
cbBuild -o alpha
The initial run of cbBuild may take quite some time, especially if you are working with a large dataset (>100,000 cells) or one that is based on matrix.mtx.gz files. If that sounds like your dataset, it may be wise to run this initial build in a terminal window using mosh so that it won’t be interrupted.
If you are working with a collection, you can build all of the datasets for that collection onto cells-test at once:
cbBuild -o alpha -r
Once the build is complete, checkout your dataset on https://cells-test.gi.ucsc.edu. If it’s a hidden dataset, then you will need to add ?ds=dataset_shortname to the cells-test URL to view it.
Adjustments to cellbrowser.conf
Fill in shortLabel
After you’ve exported a dataset, the default shortLabel is often set to the short name or output dir for the cbImport* utils. Change this label to be something more human-readable that captures the main idea of the dataset or project.
Some examples of good shortLabels include:
Add colors
For a ‘live wrangling’ dataset, the colors should be supplied by the submitter. Always ask them first.
Some h5ad files store color information in the ‘uns’ slot. If this is the case for your dataset, you can extract the colors using colorExporter:
colorExporter -i my_dataset.h5ad -o colors.tsv
Occasionally, h5ad creators will have changed a metadata field name in obs, but not changed the name of the corresponding <fieldname>_color array in uns. In that case, create a two column file that has the metadata field in the first column and the uns field name in the second column. Then use the -c/--color_names option to pass this info to the script:
colorExporter -i my_dataset.h5ad -o colors.tsv –c color_names.tsv
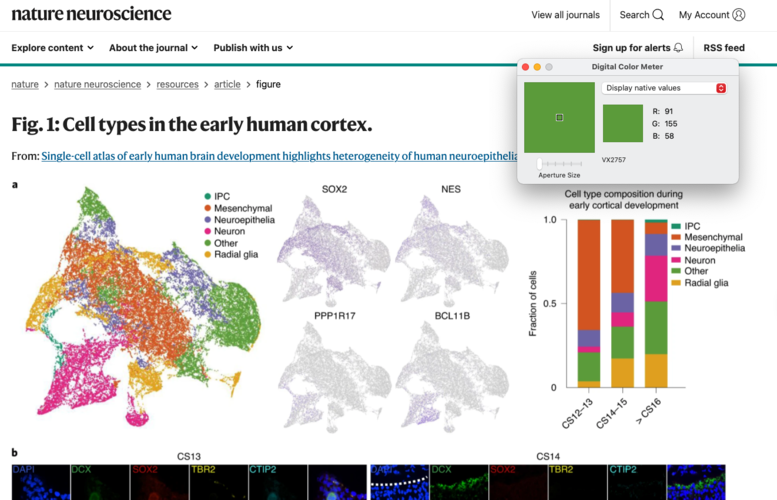
If colors are not supplied, then you can extract them from a figure on Mac OSX using the ‘Digital Color Meter’ tool:
- Open Digital Color Meter, a text file with cell types one per line, and a figure with the colors
- Ensure that the Digital Color Meter window is visible and hover your cursor over the color for the cell type you’re interested in
- Record the RGB values in text file
- Convert RGB → Hex using colorConverter
For Windows, you could use ShareX, which has a utility called “Color picker”. Another option would be 'Digital Color Meter for Windows'. In both cases, you would follow the same steps as above.
Tweak ‘radius’
In the cellbrowser.conf, the ‘radius’ setting controls the size of the cell ‘dots’ at the default zoom. You can put any number in here, both integers and floating point numbers.
For datasets with more than 50,000 to 70,000 cells, you should adjust the default radius of the cells to be larger and can help some clusters stand out more. This is mostly based on how you feel the cell browser for a dataset looks rather than some hard and fast rule, so you may determine that the default radius, even for a larger dataset is OK.
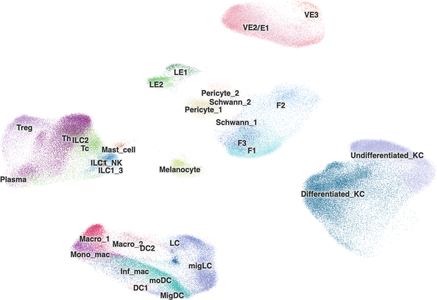
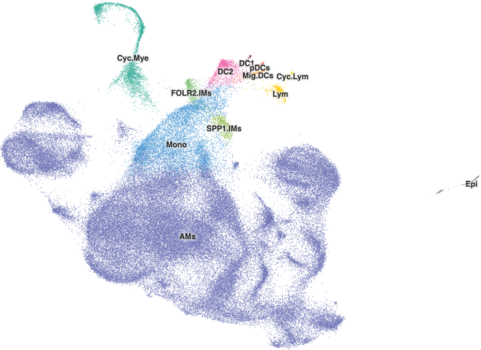
A good starting point for changing the radius is 1.9. That's something that may not work for every dataset as we radius values in the Cell Browser from 1 to 5. Here's what a value of 1.9 looks like for the healthy-human-skin dataset with 195k cells:
Tweak ‘alpha’
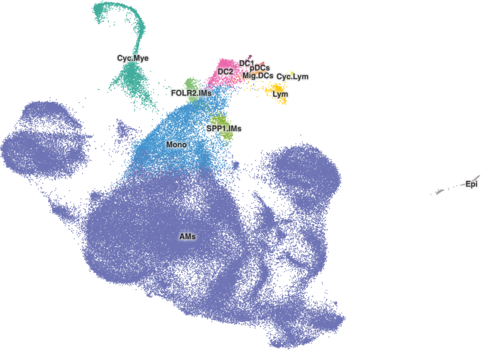
The ‘alpha’ setting in cellbrowser.conf controls the opacity of the cell ‘dots’. Any value between 0 and 1 is valid, with 0 being completely transparent and 1 being completely solid. Similar to radius, this is often relevant only for those datasets with 50,000 to 70,000 cells, where it can make cells stand out a bit more. Again it’s based more on aesthetics rather than some strict rules, though, you do need to be careful as making the cell dots more opaque may hide cells below others.
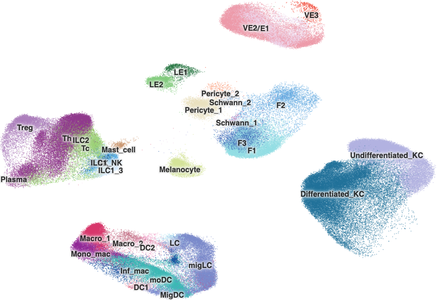
A good starting point for changing the alpha is 0.8, and it is typically best to lower that value and make cells more transparent from there. In the Cell Browser, custom alpha values range from 0.3 to 0.9. Here's what a value of 0.8 looks like for the ams-supercluster dataset with 113k cells:
(Note: ams-supercluster in these images also has radius set to 1.9)
Changing cluster labels
Maybe there’s a better one that the one you chose at first to use for the cluster labels as default. Add image of good vs bad or a case where changing labels might be a good idea
Recalculating marker genes
If you've changed the default cluster label, you'll need to re-calculate the marker genes for a dataset. There are two ways to do this: cbScanpy or re-exporting the data from the original file.
cbScanpy
In this method, you feed the expression matrix, metadata, and new cluster label field to cbScanpy to calculate the markers.
Step 1: scanpy.conf
cbScanpy has to run at least one dimensionality reduction step, which, as of now, is UMAP. Set up your scanpy.conf to only run UMAP.
Copy down a default scanpy.conf:
cbScanpy --init
Edit the 'doLayouts' line of scanpy.conf to read:
doLayouts=['umap']
Step 2: running cbScanpy
Next, run cbScanpy. If the scanpy.conf is in the same directory, it should automatically pick it up.
cbScanpy -i exprMatrix.tsv.gz -o m_recalc -n m_recalc --inCluster=<new label field> --skipMatrix
If it's a human dataset, don't forget to annotate the marker genes!
Step 3: cellbrowser.conf
Finally, you'll need to change cellbrowser.conf to point to these new files. You can leave things in the 'm_recalc' directory and just prepend that directory name to the file names on the markers and quickGenesFile lines.
Re-export
This method is probably the easiest if you are starting with a Seurat or h5ad file and the dataset isn’t too large. Marker gene calculation via Seurat is quite slow, so it may be ideal to use cbSscanpy to recalculate the markers since it's typically faster.
For cbImportScanpy, your command might look something like this:
cbImportScanpy -i <file> -o m_recalc -m --clusterField=<new label field>
For cbImportSeurat, the command might look like this:
cbImportSeurat -i <file> -o m_recalc -x --clusterField=<new label field>
In both cases, we’re skipping the matrix export step (-m or -x). There’s no need to export it again, since you should already have the expression matrix.
Once the recalculation is done, change cellbrowser.conf to point to these new markers file and quickGenes file (if one wasn’t provided by the submitters). Don’t forget to annotate this marker file if it’s a human dataset!
Fill out desc.conf
For live wrangling datasets, you should be having the submitters fill out one of our example desc.confs. If the project is going to be public immediately (i.e. no visibility=”hide”) then you can commit an example desc.conf for their dataset to the cellbrowser-confs repo and ask them to fill it out there and submit a pull request.
You may need to make adjustments after they’ve committed their version or to what they’ve handed to you to meet our desc.conf best practices.
Make a ‘Release’ ticket
Make a ‘Release’ ticket in Redmine and record all of the changes that are going out with this push.
The title should be something like Data Release - MM/DD/YY
Template for the ticket description (you can copy/paste as this follows Redmine formatting):
**New datasets:**
* New dataset 1
* New dataset 2

**Other changes:**
* Changed short label for BLAH dataset
* Added publications for BLAH, BLAH, and BLAH datasets
This step makes the most sense if you collect 2+ datasets and/or other changes.
Stage and review dataset on cells-beta
cbPush to get datasets on cells-beta
Ensure that you can open the dataset on cells-beta, color on a field or two, search for a gene name, see that marker genes show up
Update news section
Before you push the data to cells, update the news section, the robots.txt, and rr.datasets.txt with the newest datasets. This can be done with just a single script: updateNewsSec.
Run it like so:
updateNewsSec -r
Once you’ve done this, run cbUpgrade -o beta to update the news section beta.
There is also a cronjob that runs Monday through Friday at 5 am, so if you forget to do this step and don’t push the data to cells until the next day, the news section may already be updated for your dataset.
Push data to cells
Once the datasets are on cells-beta and you’ve confirmed that everything looks good and is functioning as expected, you can push the data to cells.ucsc.edu. This can be done with the cellsPush script created by the sys admins.
Run the script like so: sudo cellsPush
You’ll be prompted for your hgwdev password, enter it, and then script will carry out the push.
Review dataset on cells
If it’s a public dataset, quickly check that it shows up in the list. Additionally, run through just a few other checks, e.g. can you color by the different fields, color by the expression of a specific gene, etc.to be sure that everything seems to be functioning as expected.
Let submitter/authors know
If this is a live-wrangled dataset, just reply to the same thread with the submitter and let them know their data is available on https://cells.ucsc.edu.
Some good examples:
Otherwise, if it was a dataset you wrangled from the archives, you can use the below template. Replace JOURNAL with the journal title (e.g. Nature, Science), TITLE with the paper title and link it to the paper url, and URL with the short URL to their dataset on our site.
Hello!
I work at the UCSC Cell Browser, https://cells.ucsc.edu, and we wanted to let you know that we imported the data for your JOURNAL paper TITLE. It is viewable at URL.
There's nothing you need to do, we just wanted to let you know we had imported it. Please let us know if you have any questions or feedback. (Additionally, if you enjoy the tool, we're happy to host other datasets for you in the future, just send us an email at cells@ucsc.edu.)
Thank you!
Here’s an example of this filled in for the aging-human-skin dataset:
Hello!
I work at the UCSC Cell Browser, https://cells.ucsc.edu, and we wanted to let you know that we imported the data for your Single-cell transcriptomes of the human skin reveal age-related loss of fibroblast priming paper in Communications Biology. It is viewable at https://aging-human-skin.cells.ucsc.edu.
There's nothing you need to do, we just wanted to let you know we had imported it. Please let us know if you have any questions or feedback. (Additionally, if you enjoy the tool, we're happy to host other datasets for you in the future, just send us an email at cells@ucsc.edu.)
Thank you!
Close ‘Release’ ticket
Once you’ve reached out to the authors, close the ‘Release’ ticket.
